Feeds:
Posts
Comments

After 4 months of oven building inactivity, this past weekend proved to have the perfect weather to start building again. Once I got the good weather alert from Vaughn (who loves The Weather Channel), I hauled out all the tools and materials I’d need to build the oven chamber arches.

Left side of oven dome

Left side of oven dome

Bricks (very carefully selected from my pile of solid brick), refractory mortar, brick grinder/cutter and more came out of storage. Spider webs were brushed off and the fun began.

Way back in November of  ’08 I had trimmed the three keystone bricks for the center of each arch. I ended up doing a little bit more trimming on one of the three but it went smoothly once I got my handy-dandy Workmate bench set up. I really couldn’t have done the cutting and trimming without the Workmate. It clamps the bricks so that my fingers or toes don’t end up in harm’s way.

right side of oven dome

right side of oven dome

That’s the one thing about Rado’s instructions (photos) that had me nervous. One photo shows him trimming a brick with the grinder but he’s using his foot to hold it on the ground. The foot had a boot on it, but still – I just cringed.

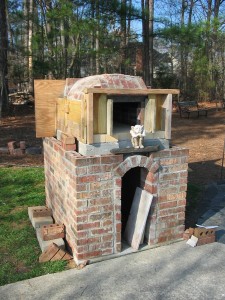
With no mishaps to report, here is the state of the oven as of today. There is still a lot to do such as the front arch, chimney, brick up the sides, and build a roof, but the oven chamber itself is finished and I can smell bread baking!

Oven front with gargoyle guardian

Oven front with gargoyle guardian

Inside the oven chamber

Inside the oven chamber

The weather here in Georgia is still not co-operating as far as brick laying goes. My brother called yesterday to ask about oven progress and we discussed how the professionals can lay brick in freezing weather. Since I’m not a professional and am in no hurry now that Thanksgiving is past, the brick laying is on hold.

A week or so ago, I ordered a sourdough starter and a couple of other items from Northwest Sourdough. I received my order promptly and set about making the dried sourdough flakes into something that would make bread.

About that time, my father-in-law gave me several 5 lb. sacks of flour that he didn’t have a use for (he’s a hoarder NOT a cook). The oldest was dated Feb. 2007 and the freshest was dated November 2007.  Being of a frugal nature myself, I decided to use the flour as part of my starter along with some fresh (this month) King Arthur bread flour. The old flour didn’t seem to hurt the sourdough action, so I proceeded to make bread.

I followed Northwest’s recipe for first loaf sourdough but was disappointed. The loaf didn’t rise much and was pale. I ate most of  it anyway.

Second try with the same recipe but here are the results. This loaf also didn’t rise over about 3 inches high and took about 30 minutes to cook. The worst part was the taste! I actually threw this in the trash rather than  consume those calories.  Here, I dug the loaf out of the trash in order to

The loaf that couldn't be saved!

The loaf that couldn't be saved!

photograph it! It doesn’t actually look too bad in this shot but believe me, it was a looser.

I still wanted some sourdough bread, but something about my technique or the starter or both was lacking. I decided to combine some of the characteristics of my successful Tassajara bread with sourdough starter.

Part of my problem with the sourdough recipe is that it makes a very wet dough.  “Challenging to work with”  is an understatement. It also takes forever to rise and the recipe allows for 2 days of fermentation and proofing. The Tassajara bread still uses a starter sponge method but only takes one longish day to produce a beautiful loaf.  To make my hybrid bread, I used the sourdough starter (which is quite liquid) for half the liquid component and warm water for the other half. Then I added some regular yeast and a tablespoon of wonderfully flavorful sorghum as the sweetner. I also added enough KA bread flour to make a dough that I could kneed easily by hand. Oh yes, NO old flour in this batch!!! Frugal doesn’t taste good.

Sourdough Tassajara loaf - the crumb

Sourdough Tassajara loaf - the crumb

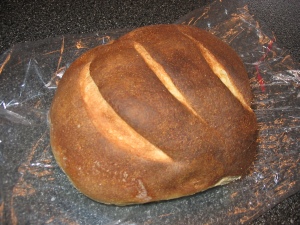
The result? Success  (to my mind and taste buds) and here are the pictures to prove it. This loaf has a mild sourdough flavor but rose high and proud with a nice crust and lovely fine crumb.

I’m not sure what I’ll use all that year old flour for, but it won’t be for my bread!

Here’s another pic of the good loaf. Note the nice slashes made with the handy and well made razor blade lame purchased from Northwest Sourdough.

Nice slash "ears" on the Tassajara Sourdough

Nice slash "ears" on the Tassajara Sourdough

Well, here it is only mid/late November and I’ve had to put a halt to all brick laying. I was all ready to form the oven dome roof arches and cold night temperatures put a stop to that idea. Mortar doesn’t set properly if the temperature goes below 40 degrees F and it’s definitely been colder than that for the last several days.

I really wanted to be able to cook our Thanksgiving turkey in the brick oven, but “next year” is when that will happen.  So, I’ve been practicing my bread baking skills in the inside oven. Here’s a picture of my latest loaf of bread. Beautiful if I do say so myself! I used the recipe for simple whole wheat bread out of The Tassajara Bread Book but substituted King Arthur bread flour (white) and added a tablespoon or so of sorghum syrup as the sugar component.  You don’t taste the distinctive sorghum flavor in the baked loaf, but it gives the bread a moistness and yumminess that lasts until it’s all gone – which isn’t long around here.  Oh yea – I baked this in the cast iron casserole dish that I bought recently (see previous post).  I lined the dish with parchment paper sprayed with a little olive oil and sprinkled with cornmeal. The loaf proofed right in the dish and was then popped into the oven set to 500 degrees F. Eighteen minutes later – the perfect loaf!

The perfect loaf - Yum

The perfect loaf - Yum

I haven’t given up all hope of being able to do some more brick work on the oven in 2008. Georgia is notorious for mild weather in November and December. Hopefully, the wooly worms weren’t right about an unusually cold winter for us.

It will be a little warmer tonight (over 40 degrees F), so I figured this would be a good day to do the prep work on laying the dome arches.  Here is a picture of the arch support that I made out of foam core boards and foam blocks. I was going to use plywood, but a similar support for the smaller arch worked out so well that I decided to try it with the biggest one too.  I did beef it up a bit, making it thicker overall (3″ instead of 1.5″).

Easy, lightweight, sturdy foam arch for dome

Easy, lightweight, sturdy foam arch for dome

Previously, after trimming three bricks that will be the keystones to the three dome arches, I did a dry brick layout and the foam form (say that three times, quickly) didn’t collapse, crack or even holler “ouch”!  I think it’s good to go.

Before laying the arch brick, I needed to make an angled “platform” out of mortar and broken bits of an old clay pot. This platform will support the first arch bricks where the dome meets the side walls. The clay pot bits act as heat absorbing filler so that the platform isn’t formed entirely of refractory mortar.

Now I wait until these platforms harden. Hopefully the cool weather won’t delay that too much. I want to do DOME ARCH #1 tomorrow while the temperature stays over 40 degrees at night.

foam arch in place, mortar supports on sides

foam arch in place, mortar supports on sides

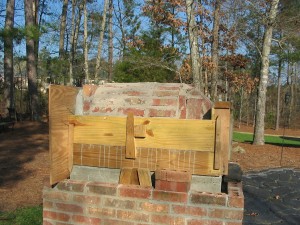
Yesterday and today I finished up the forms for the buttressing/cladding layer around the walls of my oven. I used an old piece of 1/4″ plywood for the back wall, and I was able to re-use the 1×6 and 1×8 forms and other scrap lumber that I had used for the base and hearth slabs, so lots of money was saved. It was sort of a cut and fit type of project, but it came out very nicely.

overview of buttress form with wheelbarrow

overview of buttress form with wheelbarrow

These forms are used to help pour concrete between the brick walls and the edge of the hearth slab. This gives the oven more mass for heat to sink into. This will mean I’ll be able to bake longer and at a more even falling temperature. The mass along the side walls also serves to buttress them from the outward forces that the dome arch will apply. We don’t want our domes to sag, now do we? 🙂 I used almost four 60 lb. bags of Quikrete. Had to scoot over to Home Depot for the last two. I’ve found that a bag of concrete doesn’t actually go very far – you always need more than you think.

concrete cladding poured along side wall

concrete cladding poured along side wall

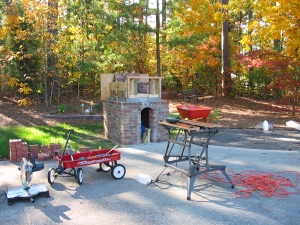
Thought you might like to see some of the tools etc. that go into brick oven building. The workplace picture shows the oven (of course), my little red wagon, our orange wheelbarrow, the miter saw, two drills (one for drilling pilot holes and one for driving screws), my mortar hoe, a small hand shovel, and other miscellaneous things like a pencil, a measuring tape, a hammer and more.

The Workplace - Tool Time!

The Workplace - Tool Time!

It’s supposed to rain for the next few days, so I really wanted to get this part done and cover it. Don’t know how much drying out will be accomplished but I’ve done my part.

More brick work during the last two days has grown the oven to the point that I can share these photos.

a little more oven chamber to see

a little more oven chamber to see

I did quite a bit of brick cutting today to make the pesky triangular pieces that fill in where the body of the oven gets narrowed down to the mouth. I wish my hand-held brick cutter could make deeper cuts so that I didn’t have to make the final separations by wacking with a hammer. Each triangular wedge got broken in the wacking process, so I’ve had to stack the broken pieces, mortar around them and hope they hold. I think it will be OK.

Tomorrow I start making the forms that will hold the buttressing concrete in place around sides and back.

looking into the mouth toward the back wall

looking into the mouth toward the back wall

Hansel and Gretel’s worst nightmare! The wicked witch’s oven starts to take form. The weather’s been nasty, I took another trip out of town and I caught a cold on the airplane. Needless to say, I couldn’t wait to get working on the oven again!

People keep asking me how far along I am with the oven, and up till now I’ve said about 30% . Most everyone thinks that the oven chamber (or at least where the fire will be) is under the bottom arch. I keep explaining that that area is only where the dry wood will be stored, but I don’t think I’m getting through to most folks. However, after today’s work, I feel like I can now point to an area without waving my arms around to try to describe a barrel arch and say “here is the oven chamber”!!!

Oven Chamber "goin' up!"

Oven Chamber

I’m using refractory mortar between the oven chamber bricks. Very thin joints are the order of the day. And yes, if you look closely at the upright bricks at the front of the chamber, you can see daylight in those joints. Those areas will be filled in with fire brick in triangular shapes cut to fit. Therefore, I’ll be cutting more brick tomorrow with hat, dust mask and safety glasses as part of my equipment.

Twenty four solid bricks went up today and I’ll finish the upright parts tomorrow. Then I’ll buttress the walls with a layer of reinforced concrete cladding before starting to form the arched roof of the oven. More forms to build but what else have I got to do?

Chamber from the back - back wall not in yet

Chamber from the back - back wall not in yet

Progress to Share

I’m back from my trip to NC, and as the pictures below will testify I’ve made some real progress on my Georgia Brick Oven in the last two days.  Oh, need to mention that during my road trip I stopped by the Lodge cast iron outlet store in Commerce, GA and bought a large cast iron dish (picture another time) to bake “whatever” in. The “Whatever” could be bread, a roast, a small turkey, two chickens etc. etc.  And, it will fit through my oven door – something I can’t say for some of my other cookware.

First, I want to thank my Dad and sister Linda for giving me some fine hardwood fuel for the oven. When I got to the house in NC no one seemed to be home. Finally I noticed the sound of a chain saw, and when you can hear a chain saw in the middle of a 300 acre farm, it’s hopefully someone you know. Sure enough, there they were cutting up a black walnut tree that had fallen at the edge of a field. Linda cranks the chain saw and then hands it over to my 89 year old dad to do the cutting. AMAZING! As for the pecan wood, that had been cut previously and was stacked in the barn. It was in pieces that were too chunky for my oven, so they cranked up the log splitter to make kindling size pieces.  That pecan wood is extremely tough, and when the splitter finally did its thing you wouldn’t believe the POW noise as the split pieces of wood went flying! I’m so glad I was standing far far away.

After I got home, the wood was stacked to dry out. I meant to cover it with a tarp but procrastinated. Therefore, it immediately rained all the next day.  When I got started with the oven again, the first thing to do was continue with the side and back walls and cut bricks for and around the archway over the oven’s wood storage area. That went so well (using my recently purchased Black & Decker Storm Force hand-held cutter/grinder with diamond blade) that I decided to go ahead and mortar those bricks in place.

I had previously made an arch form out of foam core board with foam blocks glued between. I would normally have made the form from plywood and lumber, but I read a post where someone had used cardboard to make an arch form and I decided to give the slightly sturdier foam core a try. Just for the record, this lightweight and seemingly flimsy form worked extremely well. It was easy to cut out and was definitely rigid enough to support the six bricks in my arch. This form is the white half circle seen in the photo.

This is as far as the outer brickwork will go until the actual oven chamber is complete. Any higher and the walls would just get in my way as I’m placing the oven chamber brick.

Last thing I did today was mortar the hearth brick to the top of the hearth slab. The hearth brick turned out pretty well. Not as smooth and seamless as perfection but with that front arch in place the oven really starting to look like something! Click on the pics to embiggen.

Raincoat for the oven

Raincoat for the oven

I’ve covered the oven with a blue tarp to keep it dry from now on. Previously, if the brick got rained on, it was just a good way to keep them clean. However, now I want the core of the oven to start drying out.

Last comment is a thank you to two Mormon missionaries who helped me pick up brick from the side of the road. I had seen some abandoned brick from a demolished mail box post and went back today to scavange it before some other oven builder got them. They don’t match perfectly but will be OK to use for the back of the chimney or accent brick around the next arch which will be the oven door. I was loading them into the back of my truck when these two guys jumped out of their car (no, they weren’t on bikes) and asked if I had “lost my load”. At first I thought they might be cops come to arrest me for stealing bricks (ask my husband sometime about a previous bad day). However they were just nice young guys, helpful, interested in my project and even knew a place where I could get more free brick if needed.  I took their phone info just in case and then we went our separate ways with the day made a little more interesting for all of us. They are a long way from home and I wish them well.

The Mormon Brick

The Mormon Brick

Progress before NC trip
Progress before NC trip

Movin’ on Up

It’s been raining steadily all day today, so it’s a good thing that I finished using the mortar on hand yesterday. The outside brick work is getting very close to the level of the hearth slab especially around the back and left side.

I’m taking a few days off (yes, I know I just got back from vacation) to visit my dad in Yadkinville, NC. Friday is his 89th birthday and I don’t get to see him often enough. I’m taking a slide show of pictures of the oven to share with him and other family that will be at the Birthday Party.  Most everyone in the family is pretty handy with tools so it will be fun to show them how the oven is coming.

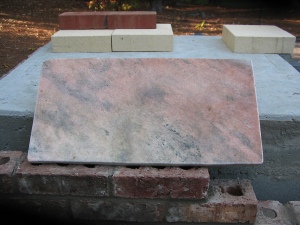
Tried to add some pics for the record. However, something isn’t cooperating, so I’ll edit them in later. The rectangular slab of stone is pink granite salvaged from the Atlanta UAW meeting hall that was demolished. My father-in-law had been saving that for “something” and when I expressed an interest in it he was glad to pass it down as his Union Legacy.

Pink Granite slab for oven entry

Back from a nice trip to the beach – St. Simons Island to be exact. If you’ll remember from my last post, my back was giving me some trouble, so it was a good thing to have a week long forced layoff from mixing mortar and laying brick. Rest, Tylenol and Bloody Marys did the trick but it was disconcerting how long it actually took until my back wasn’t giving any sharp twinges.

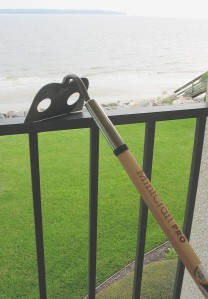
We stayed at a condo complex right in the Village, so had lots of time to browse the shops. One of my very favorite shops is a hardware store – I think the name is Strothers. We browsed the aisles and found several brick laying tools, among which is my souvenir from the trip – a mortar hoe!

Souvenir Hoe from the Island

Souvenir Hoe from the Island

As you can see from the picture, a mortar hoe is different from a regular garden hoe in that it has two holes in the blade. These help mix the mortar efficiently and more easily than a solid blade hoe. This blade also has a slick coating on it that doesn’t let the mortar stick to it. That coating may come off with continued use but by that time I won’t be using it any more. I justified the $23 for this hoe by the pain in my back. If it will make the job easier, it will be worth every penny!

Also thought I’d share a picture of Vaughn relaxing on the condo porch and one of his pelican buddy on the pier with our condo in the background. We had some fabulous food, took some leisurely bike rides, I did some knitting, and we both read and enjoyed the aforementioned Bloody Marys. 

Vaughn in relaxation mode

Vaughn in relaxation mode

If you want a super Bloody Mary recipe, first make your own flavored vodka by soaking a couple of split jalapenos, a habanero, and a poblano pepper in a jar with a fifth of vodka overnight. Strain the peppers and seeds out, replace the vodka in it’s original bottle and keep the vodka in the fridge. When you’re ready to make the BM, mix a jigger of the vodka with an 8th teaspoon of horseradish. Add tomato juice and maybe a half jigger of water (to dilute thick tomato juice) to a tall glass of ice. Finish off with a grind of black pepper and enjoy! This is a Guy Fierie recipe from the Food Network so I can’t take credit – I can only pass along a very good thing.

Moocher the Pelican on the St. Simon's pier

Moocher the Pelican on the St. Simon